
Want to take your drumming to the next level? Learn how to write drum fills. Here, Chicago, IL drum instructor Michael P. shares his three simple steps to create powerful drum fills…
As a drum teacher, I hear a lot of questions about drum fills.
Drum fills are great to spice up a song and show off your chops, but when you sit down to write a fill, it’s easy to end up scratching your head and asking yourself, “what do I do now?”
So next time you find yourself in this situation, try these three steps to turn a simple idea into a killer drum fill.
Step 1: Research
The first step in putting together a great fill is to dig for ideas. These days, it’s easier than ever. Just Google “cool drum pattern,” “drum rudiments,” or “accent patterns,” or check out one of the many drum lessons on YouTube.
Another great strategy is to listen to drummers who play your favorite styles. See what elements they use in their fills, and try to use similar elements in your own songs.
Don’t just consider rhythm; think about the wide range of dynamics and timbres available on your drum set.
Here are some elements I like to use in my fills:
- Rhythm: eighth notes, sixteenth notes, triplets, flams, five-stroke rolls
- Dynamics: accent patterns, ghost notes
- Timbre: double-kick, tom-tom, ride bell, open hi-hat
If you want to get creative, listen to different music styles and see if you can incorporate these ideas in your own style. Remember, the goal of a drum fill is to complement the rest of the music, so try to choose elements that will fit with your song.
Here’s an example:
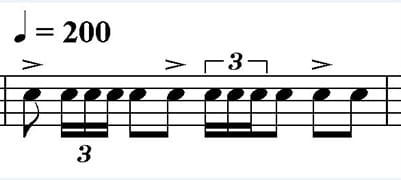
My fill is a one-measure chorus-to-verse transition in a driving metal song, but I’ve decided to start simple with this classic accent pattern:

I’ll also add in triplets, double kick, and tom-toms for extra flavor.
Step 2: Deliberate Experimentation
Now that you have elements to put in your fill, it’s time for the fun part: experimenting!
At an easy tempo, play through the beat just before the fill. Once you have a good feel for that part of the song, try out a fill. Piece together some elements you like, play through them, and see how they sound together.
Then, ask yourself the following questions:
- Is there a different rhythm I could use to spice this up (flam, triplet, etc.)?
- Can I switch this note or group of notes to different instruments?
- Could I alter the volume or accent the notes in a different way?
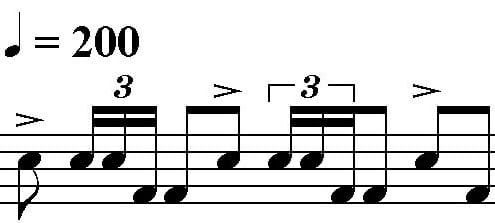
I call this step deliberate experimentation because I use these questions systematically to transform the fill into something I really like, as in the following example:
I’ve already got some good accents here, but I want to make the unaccented rhythms more interesting, so I’ll add triplets (rhythm).
Much better, but now the fill is a bit monotonous because it’s only played on the snare drum.
I’m going to throw in some double kick (timbre).
Great. Now, let’s bring out the accents even more by doubling them up on the floor tom as well (dynamics).
I still think there’s a bit too much snare, so let’s put the unaccented snare hits on the medium tom-tom instead (timbre).

There. That’s a pretty awesome fill. See how I changed one or two elements each time to transform the ordinary accent pattern into something cool?
Step 3: Testing
Now that you have a cool fill, it’s time to test it out.
Play the fill in the context of the song. Does it match the energy and the timing? Does it complement the other instruments? Is it carrying through an important transition?
If you’re in a musical group, this is a good time to ask for feedback. Your fellow musicians will be able to tell you if you’re suffering from ODS (Overactive Drummer Syndrome).
If the fill doesn’t fit with the music, that’s OK. You aren’t always going to get it right the first time. Write down your idea and go have some more fun experimenting!
Here’s a sample of my drum fill:
I’m pretty pleased with how it sounds, so I’m going to keep it and start working on the next one.
Well, that’s it! Now you know the secret to making awesome drum fills: research, experimentation, and testing.
Go ahead and give this process a try; before long, you’ll be rocking the house like your favorite drummers!
 Post Author: Michael P.
Michael P. teaches percussion and drum lessons in Chicago, IL. He has been playing drums for over 15 years, and recently played with the heavy metal band Erlang Kovata. Learn more about Micahel here!
Photo by Flavio Serpa

The post 3 Simple Steps to Create Powerful Drum Fills appeared first on | TakeLessons.